This is part of a longer story about doing a master suite addition project on my own home. I’ll add more posts as the project takes shape but you can start here to learn more about the remodel.
A little story about cesspools
One of the surprises when I got to permitting my project was the requirement to decommission any unused/abandoned cesspools on the property. When I looked at the historic plumbing permits attached to my property (usually badly scanned documents decades old with handwritten notes and barely legible maps), I noted that it had a cesspool and was stamped “Decommissioned.” Apparently, “decommissioned” in this context doesn’t mean that the cesspool or septic tank has been removed and/or filled. The city sees this as being abandoned but still existing on the site…somewhere.
Let’s talk about where “somewhere” is because the prospect of there being a “somewhere” there is a little daunting. Where is the cesspool? What if we dig and we don’t find it? Is that evidence that the pool is gone or “decommissioned” for real or just that it is somewhere else? And if it is somewhere else (shared with another property in some central location, for instance) what is our obligation to find it? On that last question, I don’t have definitive answers and the city folks I spoke with were a little circumspect about what would be required. Fortunately for us, we didn’t have to answer that question because we did find it and it was pretty amazing.
Background on my home
My house is a 1950s cottage. It’s not a ranch in the sense of the long, low-slung ranch you’re imagining. It’s a “modest modern” and fits the style of a cottage though it has the nice deep eaves and cute, hipped roof you often see on this era of home. It’s well-built with original cedar shake siding in excellent condition. It’s a two-bedroom/one bath with a dining room, living room and a nicely-proportioned kitchen. It has an attached garage in which we’ve never parked a car. The garage is our bike shop, arduino tinker space, craft brewery, laundry, gear storage and, when we clear enough space, the location of championship hula-hooping contests with my daughter. Our garage is a hard-working space and I love it.
We are on a small lot in outer Southeast Portland and our neighborhood was part of “unincorporated Multnomah county” until the 90s. When it became part of the county for good, the county put the homes on the city sewer system and cesspools were abandoned.
What is a cesspool?
This information from Plumbing Basics.com describes our type of cesspool pretty well (and goes into detail on other systems like septic tanks) –
“The cesspool is considered outdated today. Its principal advantage lies in the fact that it is a simple and inexpensive installation. The system consists of a large hole in the ground that is lined on the inside with rocks or concrete blocks laid without mortar. The sewage from the house flows into this tank and the liquids filter through openings in the rocks or blocks and are absorbed into the earth. The top of the cesspool is provided with a tightly fitting concrete lid to keep out insects and vermin.”
This is a apparently quite common in Portland and there are many still in use today. In fact, I discovered that all the rain gutters drain into their own “cesspools” which are smaller versions of the larger one that handles sewage and they are still in use. These are brick-lined pits below the surface of the ground and allow whatever comes into them to trickle out into the surrounding soil slowly. Over time, they can fail where they get clogged and overflow the top. They can also collapse and create a sink-hole if the lids or sides fail structurally. As a property owner, this is likely your primary concern. Lastly, they may simply get abandoned and live in obscurity under the ground with you, the homeowner, none-the-wiser… until you go to permit your addition, of course. Then the fun begins.
The fun stuff
I first consulted with local firm EcoTech about the location of the possible cesspool and their process for decommissioning or removing the cesspools. I didn’t know if my contractor would be interested in adding this to their queue of work and I wasn’t sure if it would delay start of my project if we didn’t get this all sorted out ahead of time. They came out and put a mark on the grass where they assumed the cesspool would be – directly back from the main plumbing stack (the toilet) and about 10’ from the foundation edge is typical. They guessed a 3’ diameter cesspool about 2.5’ below the ground surface. They brought a probe to see if they could locate the concrete lid of the cesspool but because of our very rocky soil, they weren’t able to move the probe more than a few inches before it would get stopped by rock.
Ultimately, my contractor did agree to take on the work, we agreed on an estimated price, and then were off and running. It was important to get this located, filled and inspected by the city before we could begin the process of building the addition. My contractor had a few horror stories about cesspools that could not be found or were located 15’ below the ground surface! We crossed our fingers and got to work.
Cesspool location tips
So, first things first – I wasn’t sure there even would be a cesspool. Because, really? How would I not know about this? I have lived in this house for ten years! Okay, so finding it, what are the clues? One is whether there is an original pipe somewhere underneath your toilet that can be located heading off in some direction other than toward your current sewer connection. We have a dirt crawlspace and all our piping is visible. Our current toilet waste pipe heads toward the street as you would expect and connects to city sewer. One of my contractor’s intrepid team members put on hat and a mask and headed into the dusty, dirty, cobwebby crawlspace to see if he could find evidence of an original pipe. At first, he didn’t see anything. He dug a bit and all of a sudden, found it – cast iron pipe, headed toward the back yard. Uh-oh. Game on.
We set out to the yard and discussed next steps. Should we start digging at the mark indicated by Eco-Tech? We decided to investigate more next to the foundation of the house. We dug down to see if we could find where the pipe exited the foundation. It was over 12” down before we found it. We pulled earth away and discovered that the original cast iron pipe came out the foundation and then angled! An angle means that the cesspool is likely NOT straight back but somewhere else in the yard (or beyond).
At this point you could probe and hope you don’t hit a rock or a tree root or you could just start digging. My contractor and his teammate brought back a compact loader to excavate and we laid out an angle, 10’ back from the foundation, in-line with the pipe angle and went for it. About 2.5’ down we started finding large loose bricks and other debris. Maybe it has been already decommissioned? We were hopeful. We dug some more and lo-and-behold, nearly 4’ down we hit the concrete lid. A few serious blows from a heavy-duty pry bar and we were through! Turns out it was a bit of a monster of a cesspool – well over 3’ wide (closer to 5) and about 10-12’ deep, brick-lined without mortar (to allow seepage) and – thankfully – after 20-years of non-use, empty and not smelly. This is the point at which I forbid my daughter from exploring the backyard without us because I didn’t want to have to rescue her from the bottom of a well! We also had to take care to cover the pit so none of the neighbor’s cats or any other animals could decide to get curious. Nobody wanted to rescue an angry raccoon from the bottom of a cesspit.

Next, the decommissioning was fairly straightforward. My contractor trucked in many yards of quarter-minus gravel and filled the pit to within 18” of the lid. Then we called for the inspection. They need to see the lid, be able to look in the pit and see what remains of the sides and confirm the fill material. Always carefully check with your jurisdiction for their process and requirements first. You don’t want to fill a pit and then have them tell you that they require an inspection earlier in the process. Take photographs to document each part of the process in case you need them later.
The Costs & Details
Have you ever heard that rule of thumb that you should plan for building projects to cost about 20% more than your estimate? Well, this is one of those things that can eat up your 20%. Of course, depending on what you have going on with your property, costs are going to vary. Labor is a factor, too. Here’s a few things you might need from your decommissioning company or contractor:
- Excavator to dig for the cesspool
- Sewer scope
- Fill Material (quarter-minus gravel or sand to fill entire pool)
- Pump to remove material (if needed, and ewwww, hope that it’s not needed)
- Backfill material if necessary (dirt)
- Labor – project management, technician, etc.
- Permit/inspection fee
For City of Portland, the permit fee for the cesspool was one of the single largest fees on my permit at $644. The rest of the work will likely cost between $1800 and $2500. In the context of a building project, that may not be much. But it is nearly equal to my plumbing fixture allowance, so it ain’t nothing!
What does this mean for your project?
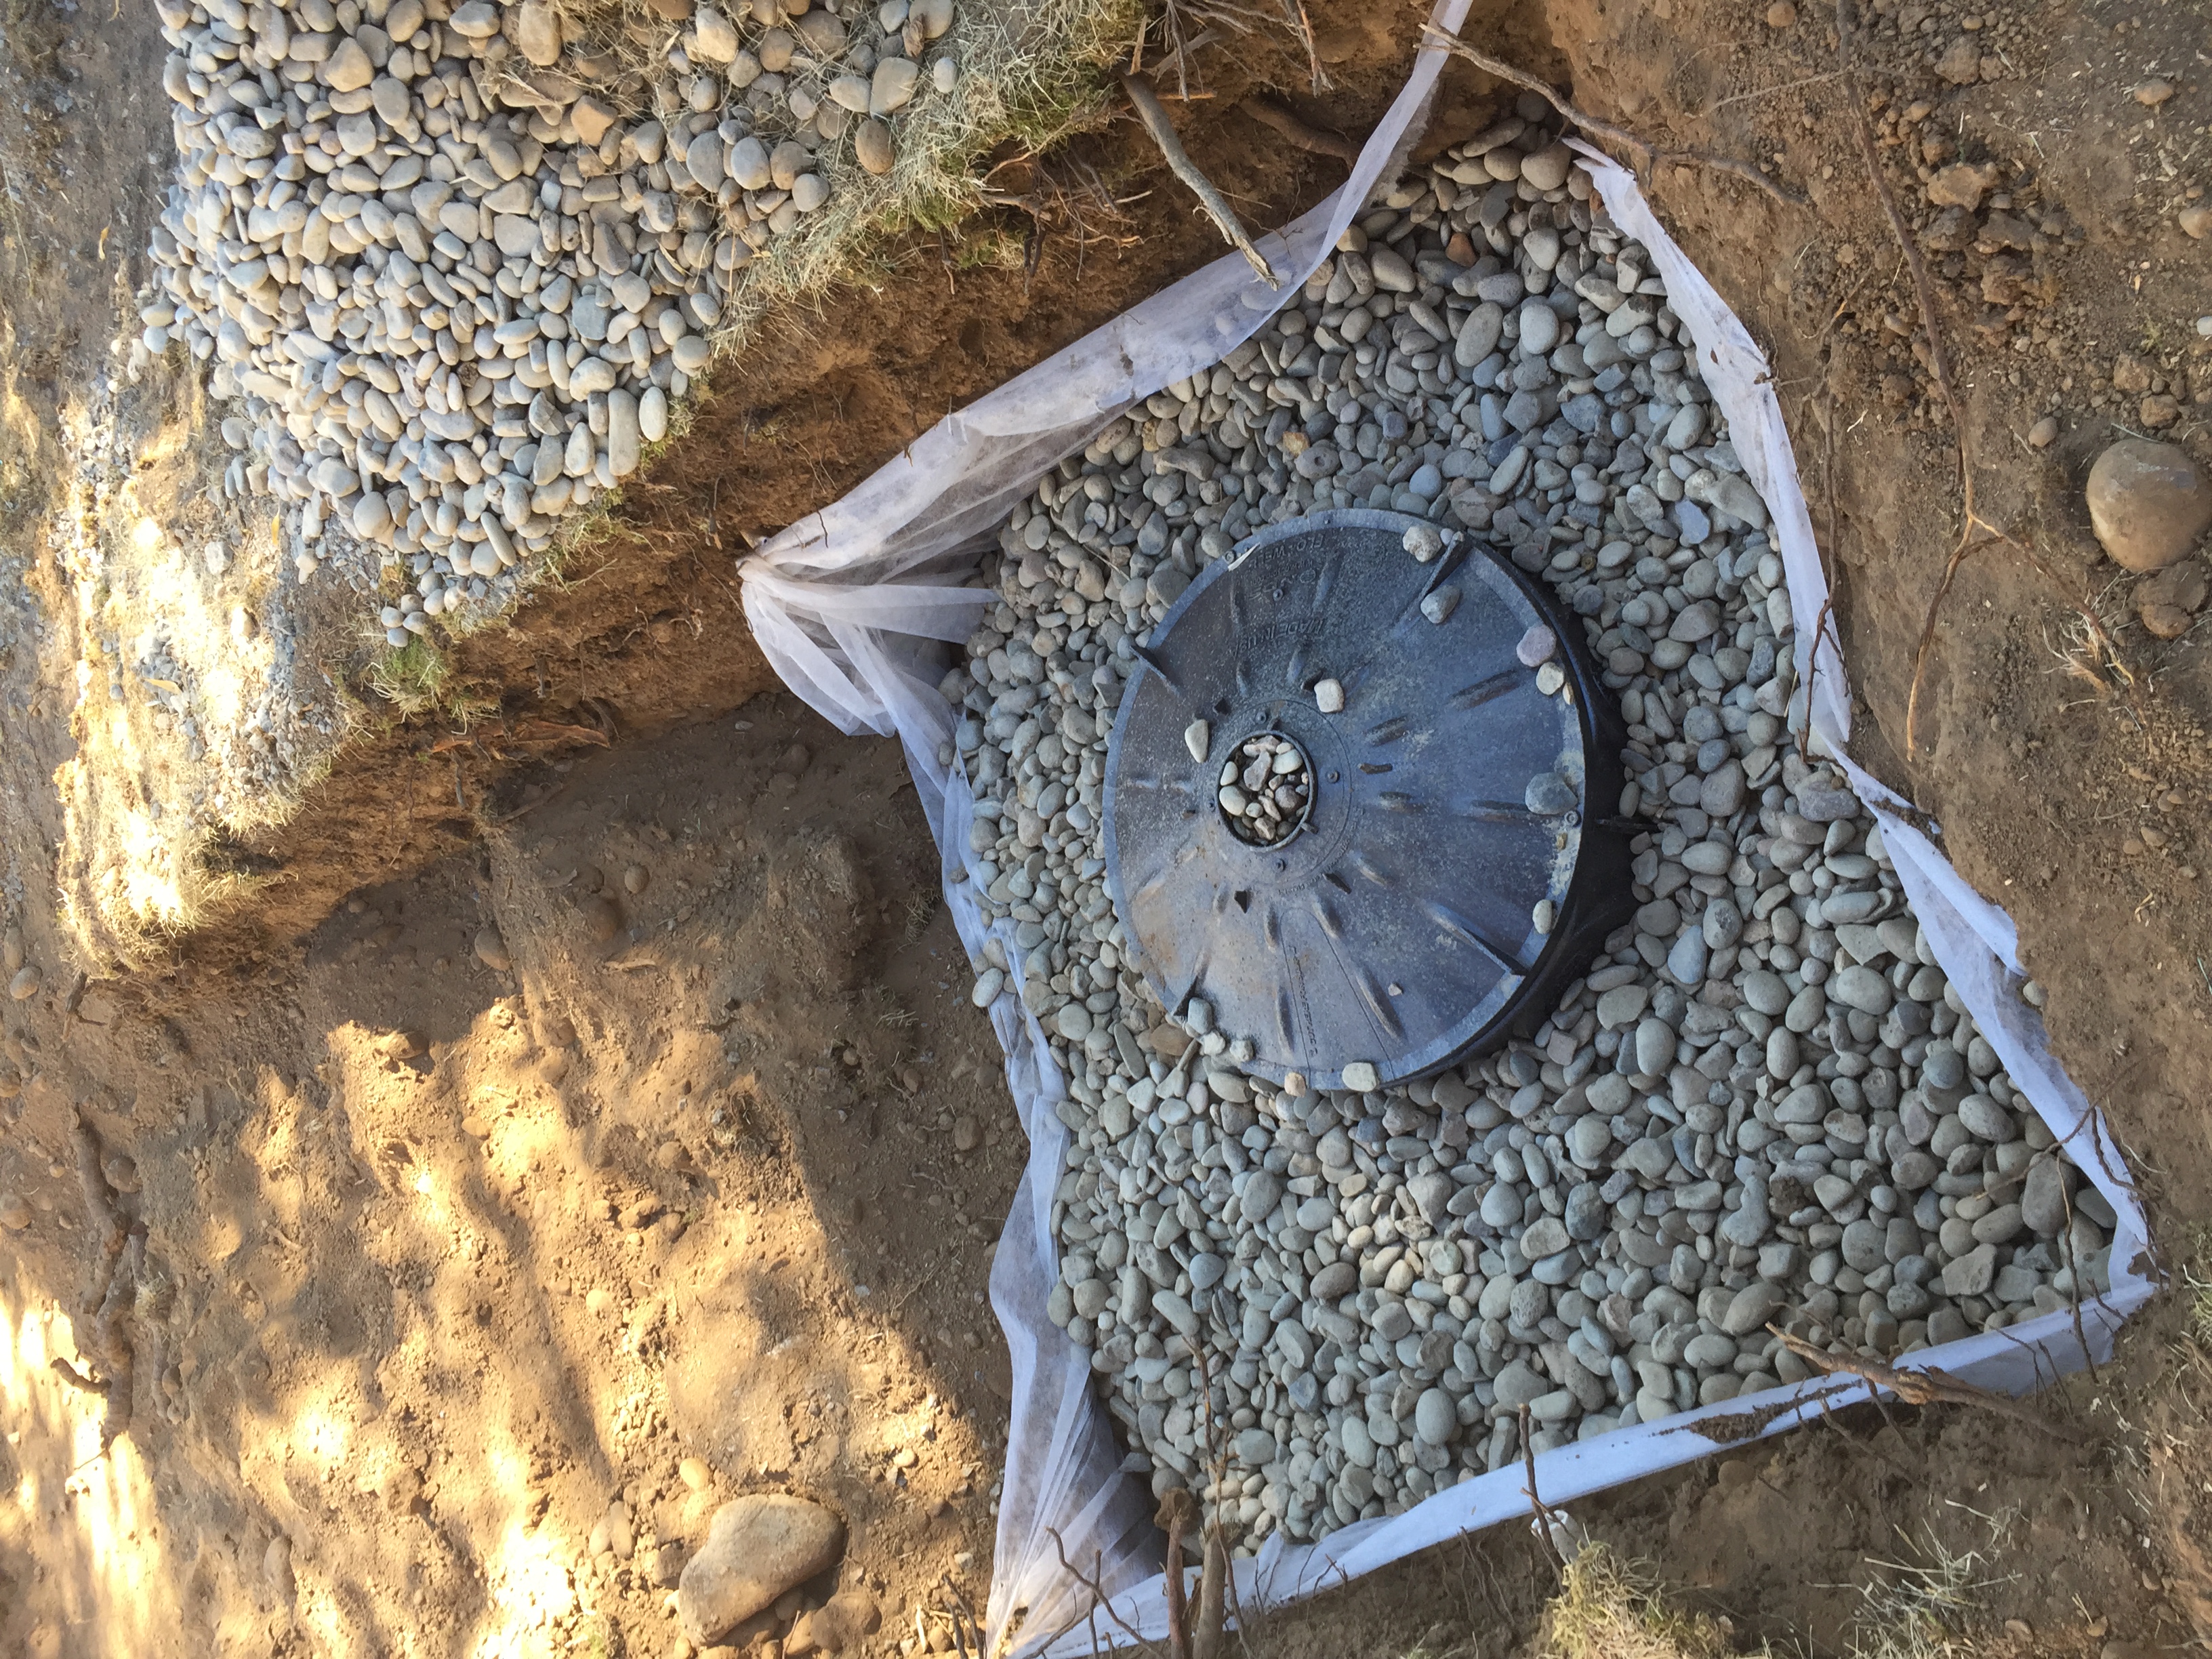
For any project where there is a chance of an abandoned cesspool within 10’ if any new foundation, the city is likely going to want you to look for and/or decommission the cesspool. Because of the location of our cesspool, we probably could have left it in place since it was off at an angle and so the center of it was right about 10’ from where our new foundation was going. However, we had all the materials in place and would have had to pause and get an official opinion as to whether it could remain so we decided to go ahead and fill it. We then took advantage of the excavated hole on top of the filled pit to put in our on-site rainwater infiltration container to handle all the rainwater that will fall on the addition. Here’s what that cool thing looks like:
This is probably all you would ever want to know about cesspools! I know it was educational for us and yet another trip into the history of Portland but I’m glad to have this un-fun, pricey little project behind us so we could get to the good stuff!